Today, I will present a state-of-the-art approach to transferring data over a mobile network in a secure and resource-friendly way. This client will run on any Linux or Zephyr based device.
Let’s assume we have the following setup where we want to transmit data over a potentially insecure network to a server in our network.
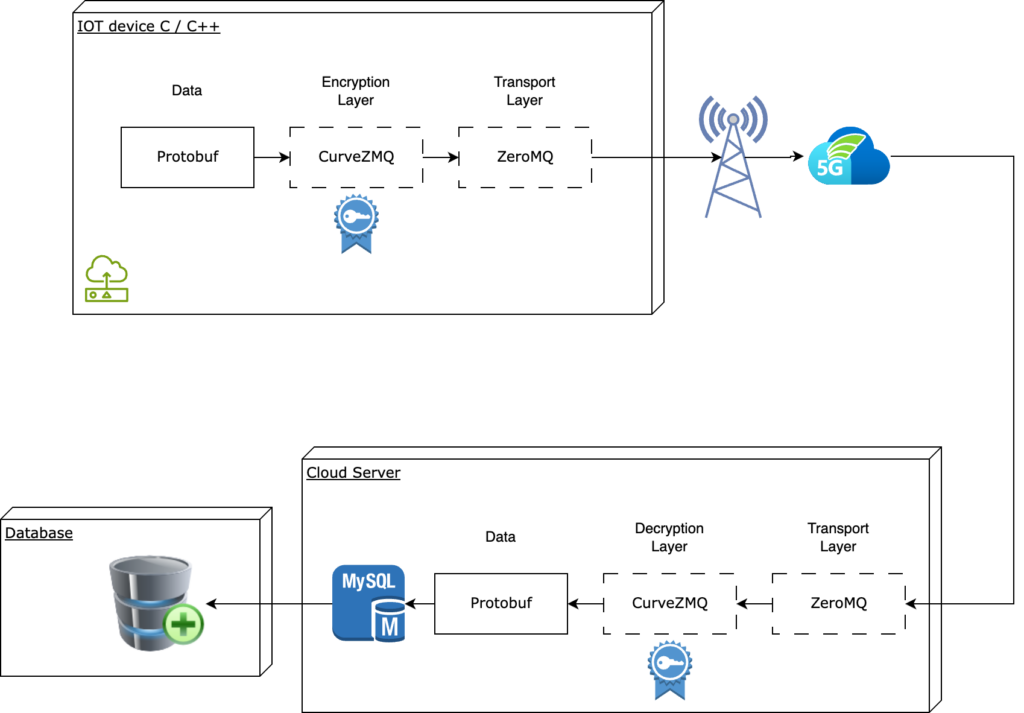
Today, I will present a state-of-the-art approach to transferring data over a mobile network in a secure and resource-friendly way.
We are combining two well-known protocols to reach this goal:
Protobuf
- Protocol Buffers (Protobuf): A Google-developed method for serializing structured data, more efficient and compact than XML or JSON.
- Efficiency: Known for its high data compression and small output size, ideal for fast data transmission and reduced storage needs.
- Schema Evolution: Uses schemas for strong typing, ensuring consistent data interpretation and supporting backward/forward compatibility.
- Multi-Language Support: Compatible with various programming languages and comes with tools for automatic code generation from .proto files.
- Nanopb for Embedded Devices available: A lightweight version of Protobuf designed for microcontrollers and resource-constrained systems, maintaining efficiency in smaller hardware.
- Use in gRPC: Frequently used in gRPC for API development, offering a robust way to connect services in different languages.
ZeroMQ with CurveZMQ
- ZeroMQ Basics: ZeroMQ is a high-performance asynchronous messaging library, aimed at use in distributed or concurrent applications. It provides sockets that carry whole messages across various transports like in-process, inter-process, TCP, and multicast.
- Simplicity and Scalability: Known for its simplicity, ZeroMQ behaves like a concurrency framework, handling I/O operations asynchronously. It scales easily, allowing the building of complex communication systems with minimal coding.
- Language Agnostic: ZeroMQ can be used with a variety of programming languages, making it a versatile choice for multi-language projects.
- Flexible Messaging Patterns: Offers several messaging patterns like request-reply, publish-subscribe, and push-pull, facilitating a wide range of communication models.
- CurveZMQ for Security: CurveZMQ is an extension of ZeroMQ that adds secure authentication and encryption to ZeroMQ using elliptic curve cryptography. It enhances security for sensitive data transmission in distributed applications.
- Minimalistic and Fast: ZeroMQ is minimalistic and lightweight, designed to be fast and efficient, ideal for high-throughput and low-latency scenarios.
ZeroMQ Pros and Cons
Pros
- Security: CurveMQ is built with ZeroMQ’s CurveZMQ protocol, providing strong security through elliptic-curve cryptography.
- Performance: It’s generally faster and more lightweight than HTTPS, particularly in environments with high message rates or low latency requirements.
- Flexibility in Message Patterns: Supports various messaging patterns like request-reply, publish-subscribe, and pipeline, which can be more suitable for complex distributed systems.
- No Need for Certificates: CurveMQ does not rely on a PKI (Public Key Infrastructure) or certificates, simplifying deployment in certain scenarios.
Cons
- Less Common: Not as widely adopted as HTTPS, which can lead to less community support and fewer resources for troubleshooting and integration.
- Complexity in Integration: Can be more complex to integrate into existing systems that are primarily built with HTTP/HTTPS in mind.
- Limited Browser Support: Not directly supported in web browsers, limiting its use for typical web applications.
Alright, let’s define our sensor data using Protobuf:
| identifier | type |
|---|---|
| Timecode | int64 |
| Temperature | float |
| Voltage | float |
| Lab_id | string |
syntax = "proto3";

message SensorData {
    int64 timecode = 1;
    float temperature = 2;
    float voltage = 3;
    string lab_id = 4;
}
Installing required libraries for Linux:
sudo apt install libzmq3-dev
sudo apt install protobuf-compiler
Here is the complete source code to transmit the data:
// sensor_data.pb.h and sensor_data.pb.cc are generated from the protoc command
#include "sensor.pb.h"
#include <zmq.hpp>
#include <zmq_addon.hpp>

int main() {
    // Initialize Protocol Buffers
    GOOGLE_PROTOBUF_VERIFY_VERSION;


    // Prepare our context and socket
    zmq::context_t context(1);
    zmq::socket_t socket(context, ZMQ_PUSH);

    // Set up CurveZMQ encryption ( replace with your keys :) )
    std::string server_public_key = "-?Svme^B0qxDkeKNvo?Jik88$q:U0[D#g?3<ilgn";
    std::string client_public_key = "jP!dRAJ5ZCE.+pJT67QoNrg-FQGVuNOCSxy)tH^z";
    std::string client_secret_key = "4w1UF3H5G%4b/uZespI.J+X+kLddFxe-?@q0+qY/";

    socket.set(zmq::sockopt::curve_serverkey, server_public_key);
    socket.set(zmq::sockopt::curve_publickey, client_public_key);
    socket.set(zmq::sockopt::curve_secretkey, client_secret_key);

    socket.connect("tcp://172.31.39.10:7777");

    // Create and fill SensorData message
    SensorData data;
    data.set_timecode(123456789);
    data.set_temperature(25.5f);
    data.set_voltage(12.6f);
    data.set_lab_id("Lab123");

    // Serialize to string
    std::string serialized;
    data.SerializeToString(&serialized);

    // Send the serialized data
    zmq::message_t message(serialized.begin(), serialized.end());
    socket.send(message, zmq::send_flags::none);

    // Clean up
    google::protobuf::ShutdownProtobufLibrary();
    return 0;
}
Convert protobuf to c++ and compile our sensor binary:
protoc --cpp_out=. sensor.proto
g++ -o sensor main.cpp sensor.pb.cc  -lzmq -lprotobuf
Ok, we are done with the client, let us jump over to the server and install the required libraries for python:
pip install pyzmq
pip install protobuf
We need some crypto keys for the server and the client. The easiest way is to use Python:
(you need to generate two key pairs: One for the server and one for the client. The public server key needs to be included in the client’s C++ code)
import zmq

# Generate a new CurveZMQ key pair
public_key, private_key = zmq.curve_keypair()

print("Public Key: ", public_key.decode('utf-8'))
print("Private Key:", private_key.decode('utf-8'))
And we are nearly done. Let us set up the Python server.
# sensor_pb2.py is generated from the protoc command
import sensor_pb2
import zmq

def main():
    context = zmq.Context()
    socket = context.socket(zmq.PULL)


    # Set up CurveZMQ encryption (replace with your keys)
    server_public_key = b"-?Svme^B0qxDkeKNvo?Jik88$q:U0[D#g?3<ilgn"
    server_secret_key = b"qanpo*qO=qS%EqyqnFgU(<G:kVG+x]u.R5{sYYw#"

    socket.curve_publickey = server_public_key
    socket.curve_secretkey = server_secret_key
    socket.curve_server = True  # This must be a server socket

    socket.bind("tcp://*:7777")

    while True:
        # Receive a message
        message = socket.recv()

        # Deserialize the data
        data = sensor_pb2.SensorData()
        data.ParseFromString(message)

        print(f"Received data: {data}")

if __name__ == "__main__":
    main()
Can I run this on a bare metal app on a uC?
CurveZMQ relies on cryptographic operations provided by libsodium for its security features, specifically for the CurveCP protocol. Therefore, you would also need a port of libsodium. I guess for a system without an OS, you should look for a different crypto solution. However, protobuf is still a great choice.