To get a better understanding for RISC-V in hardware let us try to bring a RISC-V implementation to one of the smallest FPGA from Xilinx. The Kintex-7 and the Spartan-7 on the cheap CMOD A7 dev boards.
The latest project and source code from 2023 can be found on GitHub: https://github.com/irmo-de/xilinx-risc-v
First of all you may ask why there are different hardware implementations at all. The RISC V open source instruction set architecture (ISA) defines everything visible to software. This includes things like the instruction set, data types, registers, addressing modes, memory model and so on. The actual underlying hardware is not defined.
What you can learn from this post
- use RISC-V in your own FPGA designs to be vendor independent
- having fun with an open source architecture
- a small RISC-V core for embedded use.
Limitations
- the RISC-V design we are using here is optimized for area and fmax , not for performance. It is usable for control logic and simple tasks.
- Debugging your software directly in hardware is not supported. (no hardware breakpoints)
- no floating point unit
Before we start, we have a look at two helpful tables that tell us more about the RISC-V architecture and this post will refer to these tables several times.
The first table tells us more about the ISA base and the optional extensions:
| Name | Description | Version | Status[a] | |
|---|---|---|---|---|
| 1 Base | ||||
| RVWMO | Weak Memory Ordering | 2.0 | Ratified | |
| RV32I | Base Integer Instruction Set, 32-bit | 2.1 | Ratified | |
| RV32E | Base Integer Instruction Set (embedded), 32-bit, 16 registers | 1.9 | Open | |
| RV64I | Base Integer Instruction Set, 64-bit | 2.1 | Ratified | |
| RV128I | Base Integer Instruction Set, 128-bit | 1.7 | Open | |
| 2 Extension | ||||
| M | Standard Extension for Integer Multiplication and Division | 2.0 | Ratified | |
| A | Standard Extension for Atomic Instructions | 2.1 | Ratified | |
| F | Standard Extension for Single-Precision Floating-Point | 2.2 | Ratified | |
| D | Standard Extension for Double-Precision Floating-Point | 2.2 | Ratified | |
| G | Shorthand for the base integer set (I) and above extensions (MAFD) | N/A | N/A | |
| Q | Standard Extension for Quad-Precision Floating-Point | 2.2 | Ratified | |
| L | Standard Extension for Decimal Floating-Point | 0.0 | Open | |
| C | Standard Extension for Compressed Instructions | 2.0 | Ratified | |
| B | Standard Extension for Bit Manipulation | 0.92 | Open | |
| J | Standard Extension for Dynamically Translated Languages | 0.0 | Open | |
| T | Standard Extension for Transactional Memory | 0.0 | Open | |
| P | Standard Extension for Packed-SIMD Instructions | 0.2 | Open | |
| V | Standard Extension for Vector Operations | 0.9 | Open | |
| N | Standard Extension for User-Level Interrupts | 1.1 | Open | |
| H | Standard Extension for Hypervisor | 0.4 | Open | |
| ZiCSR | Control and Status Register (CSR) | 2.0 | Ratified | |
| Zifencei | Instruction-Fetch Fence | 2.0 | Ratified | |
| Zam | Misaligned Atomics | 0.1 | Open | |
| Ztso | Total Store Ordering | 0.1 | Frozen | |
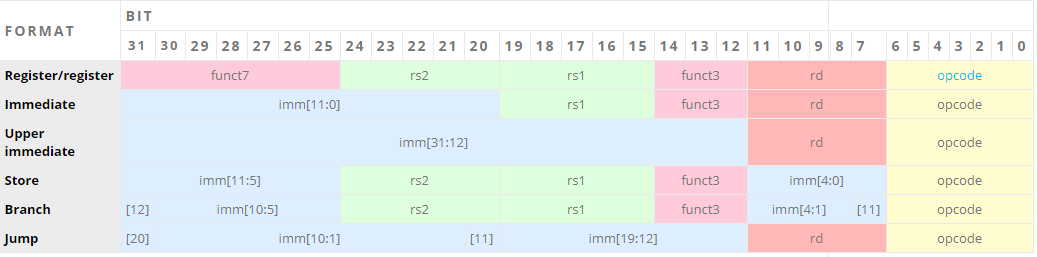
The second table is about the 32-bit RISC-V instruction formats (click on the image to enlarge)
Implemenation
For the following implementation we use the PicoRV32 core [1] from this github repository:
https://github.com/irmo-de/xilinx-risc-v
The PicoRV32 is a CPU core that implements the RISC-V RV32IMC Instruction Set. It can be configured as RV32E, RV32I, RV32IC, RV32IM, or RV32IMC core, and optionally contains a built-in interrupt controller.
With the table from above we can decode the different configurations.
A RISC-V core is designed modular with a base and optional extensions:
RV32I_M_C stands for:
RV32I – the ISA base architecture; base integer 32 bit
M – standard extension for integer multiplication and division
C – standard extension for compression
The compression extension allows to compress some commonly used instructions. Image a simple for loop: usually you have a counter decrementing by one and comparing the result with 0 to exit the loop if finished. These kinds of instructions can be coded in a shortcut that has a size of only 16 bits. If you a familiar with the ARM architecture, you may notice this concept is similar to ARM thumb instructions.
Hardware setup
Using the hardware design is extremely simply. There is only one file that needs to be added to your project: picovr32.v
This file contains four relevant modules that can be instantiated in the top level design.
| Module | Description |
|---|---|
picorv32 | The PicoRV32 CPU |
picorv32_axi | The version of the CPU with AXI4-Lite interface |
picorv32_axi_adapter | Adapter from PicoRV32 Memory Interface to AXI4-Lite |
picorv32_wb | The version of the CPU with Wishbone Master interface |
We are using the picovr32 module with simple 16kByte blockram as memory. A simple character device is mapped to address 0x1000 0000 for printing text.
For details have a look at the included system.v file.

RISC-V configuration
Here are the configuration parameters that can be set for the core:
	parameter [ 0:0] ENABLE_COUNTERS = 1,
	parameter [ 0:0] ENABLE_COUNTERS64 = 1,
	parameter [ 0:0] ENABLE_REGS_16_31 = 1,
	parameter [ 0:0] ENABLE_REGS_DUALPORT = 1,
	parameter [ 0:0] LATCHED_MEM_RDATA = 0,
	parameter [ 0:0] TWO_STAGE_SHIFT = 1,
	parameter [ 0:0] BARREL_SHIFTER = 0,
	parameter [ 0:0] TWO_CYCLE_COMPARE = 0,
	parameter [ 0:0] TWO_CYCLE_ALU = 0,
	parameter [ 0:0] COMPRESSED_ISA = 1,
	parameter [ 0:0] CATCH_MISALIGN = 1,
	parameter [ 0:0] CATCH_ILLINSN = 1,
	parameter [ 0:0] ENABLE_PCPI = 0,
	parameter [ 0:0] ENABLE_MUL = 1,
	parameter [ 0:0] ENABLE_FAST_MUL = 1,
	parameter [ 0:0] ENABLE_DIV = 1,
	parameter [ 0:0] ENABLE_IRQ = 0,
	parameter [ 0:0] ENABLE_IRQ_QREGS = 1,
	parameter [ 0:0] ENABLE_IRQ_TIMER = 1,
	parameter [ 0:0] ENABLE_TRACE = 0,
	parameter [ 0:0] REGS_INIT_ZERO = 0,
	parameter [31:0] MASKED_IRQ = 32'h 0000_0000,
	parameter [31:0] LATCHED_IRQ = 32'h ffff_ffff,
	parameter [31:0] PROGADDR_RESET = 32'h 0000_0000,
	parameter [31:0] PROGADDR_IRQ = 32'h 0000_0010,
	parameter [31:0] STACKADDR = 32'h ffff_ffff
The most interesting are:COMPRESSED_ISA – enables the compression module CENABLE_MUL and ENABLE_DIV – enables the Standard Extension for Integer Multiplication and Division
Running synthesis and implementation in Vivado 2020.1
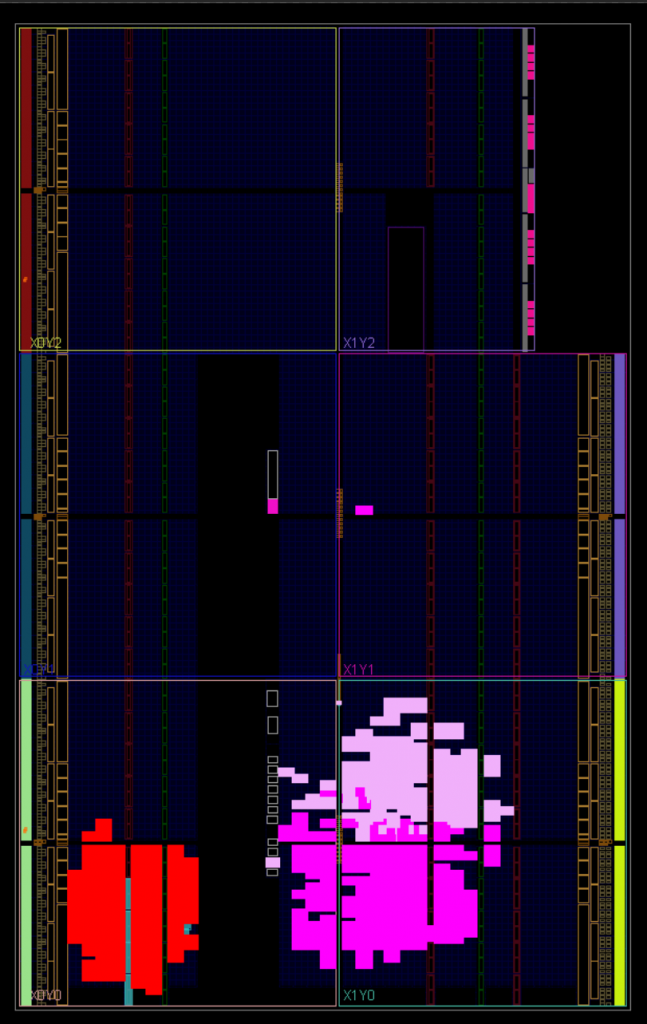
On the floorplan you can see the implementation results for an Artix A7 15T
Highlighted in red on the left side is the RISC-V core ( RV32I )
The other two colors represent the Xilinx ILA debug core that was included for analysis.
Amazing how small the core is 😍. Here we can see the benefits of a lean simply ISA design.
RISC-V software
The first step is to setup up the RISC-V toolchain. Usually, the RISC-V compiler can build binaries for all RISC-V architectures, but the standard library is built for RV32IG.
If you look at the table above this is a RV32I architecture with the G extensions. G is shorthand for MAFD. Our processor has only the M extensions.
So, if you want to use the included libraries you should compile the toolchain for RV32I only. Otherwise you can use the default compiler (you find instructions at the end of the post in appendix B)
We build the toolchain with ubuntu. If you do not have a native installation WSL for windows works as well.
The following commands build the toolchain for the architecture RV32I (if needed you can adjust this for the architecture you need) [line 15]
Example: for rv32imc change line 15 to../configure --with-arch=rv32imc --prefix=/opt/riscv32i
# Ubuntu packages needed:
sudo apt-get install autoconf automake autotools-dev curl libmpc-dev \
        libmpfr-dev libgmp-dev gawk build-essential bison flex texinfo \
    gperf libtool patchutils bc zlib1g-dev git libexpat1-dev

sudo mkdir /opt/riscv32i
sudo chown $USER /opt/riscv32i

git clone https://github.com/riscv/riscv-gnu-toolchain riscv-gnu-toolchain-rv32i
cd riscv-gnu-toolchain-rv32i
git checkout 411d134
git submodule update --init --recursive
cd riscv32i
mkdir build; cd build
../configure --with-arch=rv32i --prefix=/opt/riscv32i
make -j$(nproc)
In the end, the toolchain should be installed under /opt/riscv32i as riscv32-unknown-elf-*
Building RISC-V hello world
Download the example project (based on the PicoRV32 project) from the github repository linked above.
We need 3 files:
firmware.S(assembler init script / set the stack pointer)firmare.lds(linker [ld] script)firmware.c(C-Code)
firmware.S
.section .init
.global main

/* set stack pointer */
lui sp, %hi(16*1024)
addi sp, sp, %lo(16*1024)

/* call main */
jal ra, main

/* break */
ebreak
Our system uses 16kByte of block ram as memory for the CPU.
In the standard RISC-V calling convention, the stack grows downward, and the stack pointer is always kept 16-byte aligned.
- We set the stack pointer to the upper memory limit (16kByte = 16*1024) so it can grow down.
RISC-V handles 32-bit constants and addresses with instructions that set the upper 20 bits of a 32-bit register. Load upper immediate lui loads 20 bits into bits 31 through 12.lui sp, %hi(16*1024)
Then a second instruction such as addi can set the bottom 12 bits.addi sp, sp, %lo(16*1024)
EBREAK will trap the processor
firmware.lds
SECTIONS {
	.memory : {
		. = 0x000000;
		*(.init);
		*(.text);
		*(*);
		. = ALIGN(4);
		end = .;
	}
}
The linker script is quite simple. It just maps the code sections to address 0x000000.
firmware.c
// snippet only / complete file in github!

void main()
{
	char message[] = "$Uryyb+Jbeyq!+Vs+lbh+pna+ernq+guvf+zrffntr+gura$gur+CvpbEI32+PCH"
			"+frrzf+gb+or+jbexvat+whfg+svar.$$++++++++++++++++GRFG+CNFFRQ!$$";
	for (int i = 0; message[i]; i++)
		switch (message[i])
		{
		case 'a' ... 'm':
		case 'A' ... 'M':
			message[i] += 13;
			break;
		case 'n' ... 'z':
		case 'N' ... 'Z':
			message[i] -= 13;
			break;
		case '$':
			message[i] = '\n';
			break;
		case '+':
			message[i] = ' ';
			break;
		}
	puts(message);
}
We will see the output of the main function later 😉
Building the binary file
/opt/riscv32i/bin/riscv32-unknown-elf-gcc -Os -ffreestanding -nostdlib -o firmware.elf \
         firmware.S firmware.c \
		 --std=gnu99 -Wl,-Bstatic,-T,firmware.lds,-Map,firmware.map,--strip-debug -lgcc

/opt/riscv32i/bin/riscv32-unknown-elf-objcopy -O binary firmware.elf firmware.bin
As we are using a bare metal system without an elf loader, we get rid of the elf part and use the binary only:
objcopy -O binary firmware.elf firmware.bin
To instantiate the blockram with the firmware.bin file one more step is required. We must convert the binary file firmware.bin to firmware.hex
With the included python script this is a simple task:python3 makehex.py firmware.bin 4096 > firmware.hex
4096 is the memory size in words (4096 * 32Bit = 16kByte)
To avoid confusion: In the RISC-V ISA a word is defined as 32 bits. (For x86 and x64 architectures a word has the size of 16 bit as a backward-compatibility artifact)
firmware.hex can be used to initialize our FPGA block ram memory directly 😃
Simulation
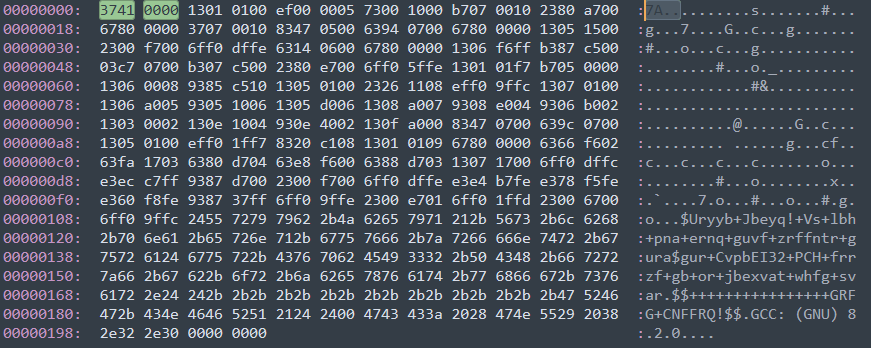
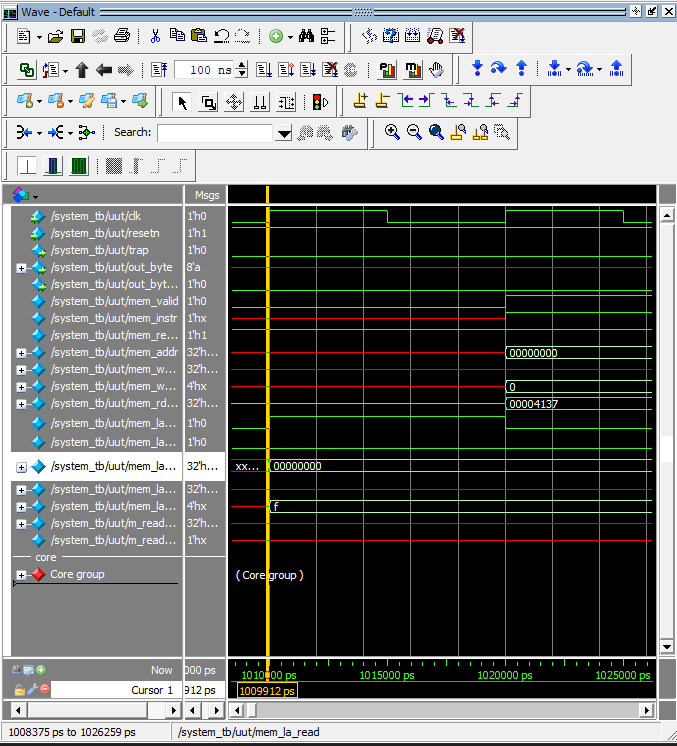
Let us check with the included test bench whether everything works as expected. As you can see in the modelsim waveview the CPU requests a read from address 0x000000 at the beginning to load the first instruction.
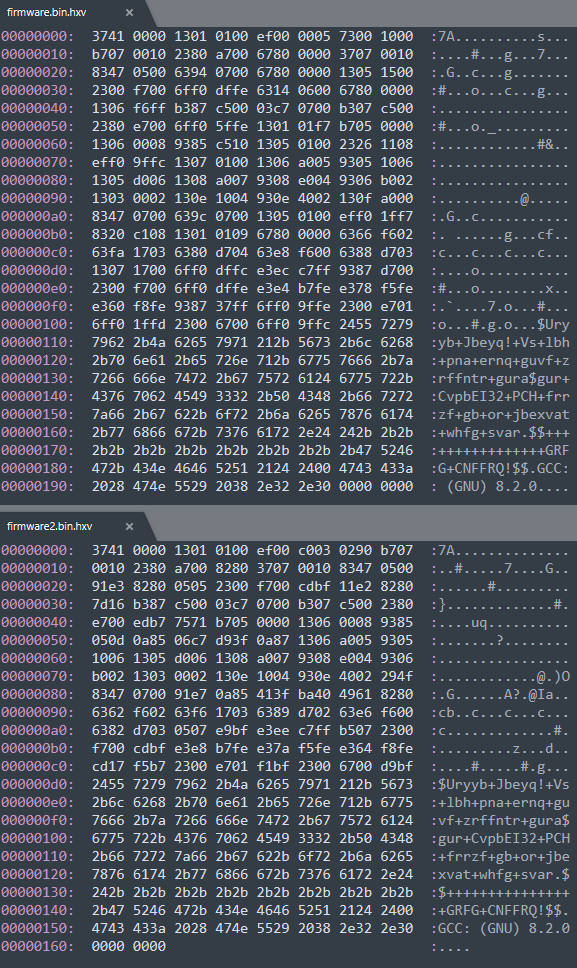
Our block ram is responding with 0x4137 (the very first instruction as you can see in the hex file view from above) Great!
Final test on hardware
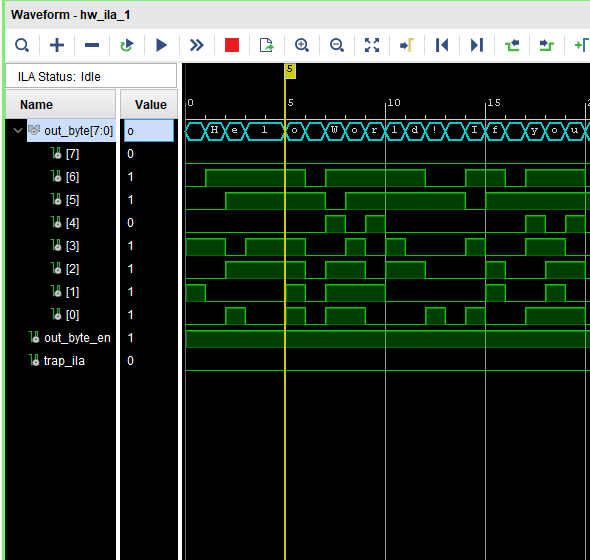
I was to lazy to connect an external logic analyzer, so I included a Xilinx ILA (integrated logic analyzer) in the design.
Let us have a look what the output of the RISC-V CPU looks like. The reset is connected to one of the external buttons.
After pressing the button the following output should be visible and we can read the secret message 😁
Appendix A
Binary without and with compression
build with compression:/opt/riscv32i/bin/riscv32-unknown-elf-gcc -march=rv32imc -Os -ffreestanding -nostdlib -o firmware.elf firmware.S firmware.c --std=gnu99 -Wl,-Bstatic,-T,firmware.lds,-Map,firmware.map,--strip-debug -lgcc
build without compression: /opt/riscv32i/bin/riscv32-unknown-elf-gcc -march=rv32im -Os -ffreestanding -nostdlib -o firmware.elf firmware.S firmware.c --std=gnu99 -Wl,-Bstatic,-T,firmware.lds,-Map,firmware.map,--strip-debug -lgcc
Appendix B
Another option is to download the prebuilt toolchain from sifive. It is available for Windows, macOS, CentOS and Ubuntu
https://www.sifive.com/software
This toolchain contains prebuilt libraries for these configurations:
rv32i
rv32ia
rv32iac
rv32iaf
rv32iafd
rv32if
rv32ifd
rv32im
rv32imac
rv32imaf
rv32imafc
rv32imafdc
rv32imf
rv32imfc
rv32imfd
[Update 2020-10-07 / moved project to github]
Ressources:
[1] https://github.com/cliffordwolf/picorv32
[2] https://github.com/irmo-de/xilinx-risc-v
[3] Introduction to RISC-V and the RV32I Instructions
https://www.youtube.com/watch?v=LKB5I12LctU
[4] Address Spaces-II & Calling Conventions (K4L0-CSCI-463)
https://www.youtube.com/watch?v=tycK1znD8Bw
I used this article as a reference for my master thesis. 🙂
We are working on a datacenter RISC-V 64-bit design. Can you contact me? xiaoming5555@foxmail.com
Can you show how to use compression?
Added as Appendix A
Do not forget to build the CPU with the C extension enabled:
parameter [ 0:0] COMPRESSED_ISA = 1
Would you recommend the pulp platform? (https://github.com/pulp-platform)
In general the PULP RISC cores are optimized for ASICs. Therefore do not expect a high clock speed.
All in all it seems to be a solid platform. Without knowing more about your application, you could try the PULPino core.
Great and straightforward introduction.
AWSOME! =)
i have something i stuck at ip ila . You can show me the solution for that
I did successful simulation but something wrong at ip ila
i appriciate that thank you